Saturday 21 October 2017

Lovely as a Tree


 Three photos of cards using Lovely as a tree stampset and the woodland embossing folder in this first one


 This one uses the same stampset and the softly falling embossing folder


If you would like some insight into how I created any of these cards drop me an email or message me on my Facebook account

Tuesday 17 October 2017

Hearts come Home bundle

Here are two very different examples of cards I have created using the Hearts Come Home bundle from Stampin' Up!
If you would like some insight into how I made them please drop me an email or message me on Facebook

Merry Patterns - Hostess only


Having not had time the last couple of months I have finally started my Christmas cards and thought I would share them here
This stampset from Stampin Up! Is a hostess set you cannot buy it only earn it
If you spend £250 or hold a party and you and your guests spend £250 you can earn the stampset I have used to create the two cards above
they are only 4.5 x4.5 but I think very beautiful
If you would like to know how I created them drop me an email or message me on Facebook and I will give you the instructions

Sunday 6 August 2017

Fabulous Flamingo


So today I have a couple of Fabulous Flamingo cards one in daytime and one at night
In the first card I inked all the background in blue and then added all the other stamping adding a layer of just the Flamingo body which I had stamped and cut out

In the second card I created a scenery at night with moonlight on the water and added two Flamingo bodies which I had stamped and cut out to layer on top

Thursday 27 July 2017

Pocketful of Sunshine, Delightful Daisy


I watched a you Tube video today by Keren Howell of Tuppence Coloured in which she made this springer card I thought it looked like fun so I gave it a go
In my first card I used the Delightful Daisy DSP and the stamps and punch along with a label punched from the pretty Label and a sentiment from Fabulous Flamingo
In the second card I went for Naturally Eclectic Dsp and the sunglasses and sentiment  from pocketful of Sunshine


Wednesday 26 July 2017

Lemon Zest, Hexagons Embossing, Dragonfly Dreams Bee


Two cards today using primarily the Lemon Zest Bundle  the stamps have a co-ordinating punch which cuts out the lemon and the leaves
in my first card I have kept it pretty simple using just the stamps and Layering up the card panel on a thin sliver of green card
In my second card I have kicked it up by using the Hexagons Embossing folder in the background and inking it with yellows and greens I have added a bee from Dragonfly Dreams and the sentiments have been stamped on a couple of square stitched shapes cut with the medium die

Saturday 22 July 2017

Fabulous Flamingo

I used Fabulous Flamingo stamps to create this card which has three step stamping for the Flamingo which is fun as you can add layers of colour
I stamped the Flamingo first in the three steps and then built up the scenery around him
I matted the panel onto some pink cardstock and then added a strip of Delightful Daisy DSP the sentiment is from the same set

Colourful Seasons


Just a few of my latest cards using Colourful Seasons , Work of Art, Seaside and Woodland embossing folders and the Seasonal Layers thinlets
The last card I made for my husband for our Wedding Anniversary and as it was packed flat in the envelope I had to show him how to put it together (note to self) enclose a diagram of how to put the card together when sending this type of card.

Beautiful Bouquet, Bouquet Bunch Framelets

This card was made using the Beautiful Bouquet stampset and the co-ordinating framelets Bouquet Bunch
if the stampset I am using is polymer I find it easier to cut out my framelets first and Stamp on them afterwards it saves a lot of time positioning the dies over the stamped images
I know you are supposed to do it the other way around and you have to if the stamps are rubber as you can't see where you are positioning the stamping, but it works for me!

Ruffled embossing folder, Sunshine Sayings & Wishes

Today's card uses the Ruffled dynamic embossing folder inked up in Powder Pink
I die cut two hearts from the Sunshine Wishes dies and added the large circle from stitched shapes and a smaller one which I punched out, the sentiment comes from Sunshine Sayings
 I made this for one of my Aunts and Uncles who live in wales unfortunately too far away from me to wish them a Happy Anniversary in person so instead I put all my love into this card for them x

Wednesday 19 July 2017

Watercolour Words, Sunshine Sayings & Sunshine Wishes

 I used two stampsets and one lot of framelets to create these three cards along with the Petal Burst embossing folder which I absolutely love
In the first two I die cut the hearts and flowers and stamped the background panels then matted and layered the panels to add colour then added the die cut elements
In thd third card I embossed a panel of card with the Petal Burst embossing folder then inked it up
I then matted and layered it and added the die cut hearts and words
 The stamped sentiments are from Sunshine Sayings which is a very versatile stampset with lots of words to choose from

Falling Flowers, May flowers framelets & sunshine sayings

 Three cards using the stamps from Falling Flowers and the co-ordinating framelets May Flowers and sentiments from Sunshine sayings
each of the cards has a background of the large scroll and then various flowers and leaves added on dimensionals to create variations on a theme

By changing the colour of the  background mat the card looks very different just choose a colour that you have stamped the flowers in

Tuesday 18 July 2017

Crafting Forever

 So today I am sharing two cards I designed using the Crafting Forever Stampset
In the first card I stamped the pens all over the background then scribbled with a marker in between, I added a Lots of Labels piece and stamped the brush pot on separate card so I could colour it in and cut it out along with a pair of scissors lastly I added the sentiment

the 2nd card uses the thread wound pegs
I stamped them onto a piece of card then coloured them in with markers I stamped the sentiment repeatedly and glued on a piece of bakers twine
Lastly adding a pair of scissors which I had stamped, coloured and cut out

Monday 10 July 2017

Magical Mermaid and Marbled


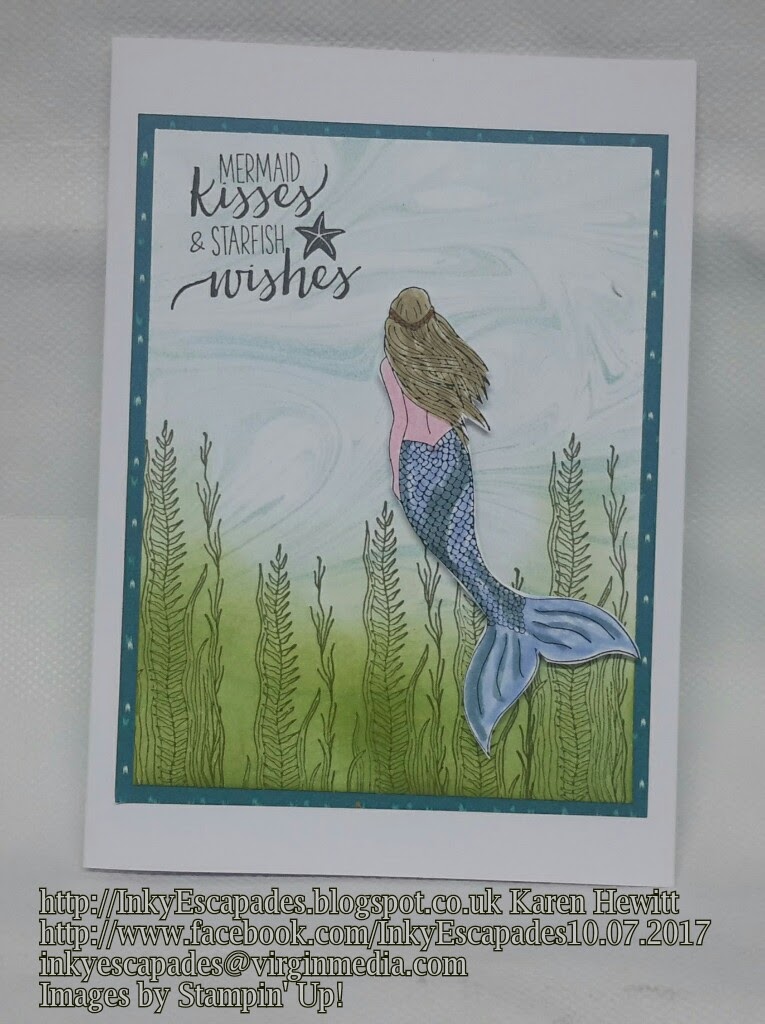
Today I have two Magical Mermaid cards to share with you

the 1st one uses the Marbled background stamp in pool party ink
I  stamped the Mermaid and coloured her in and cut her out
I then stamped the reeds at the bottom of the marbled panel and inked over them with a sponge
I added the lovely sentiment from the Mermaid stampset
lastly I layered the panel into an Island Indigo paper and added it to the card
Love this Mermaid can't stop using this set!

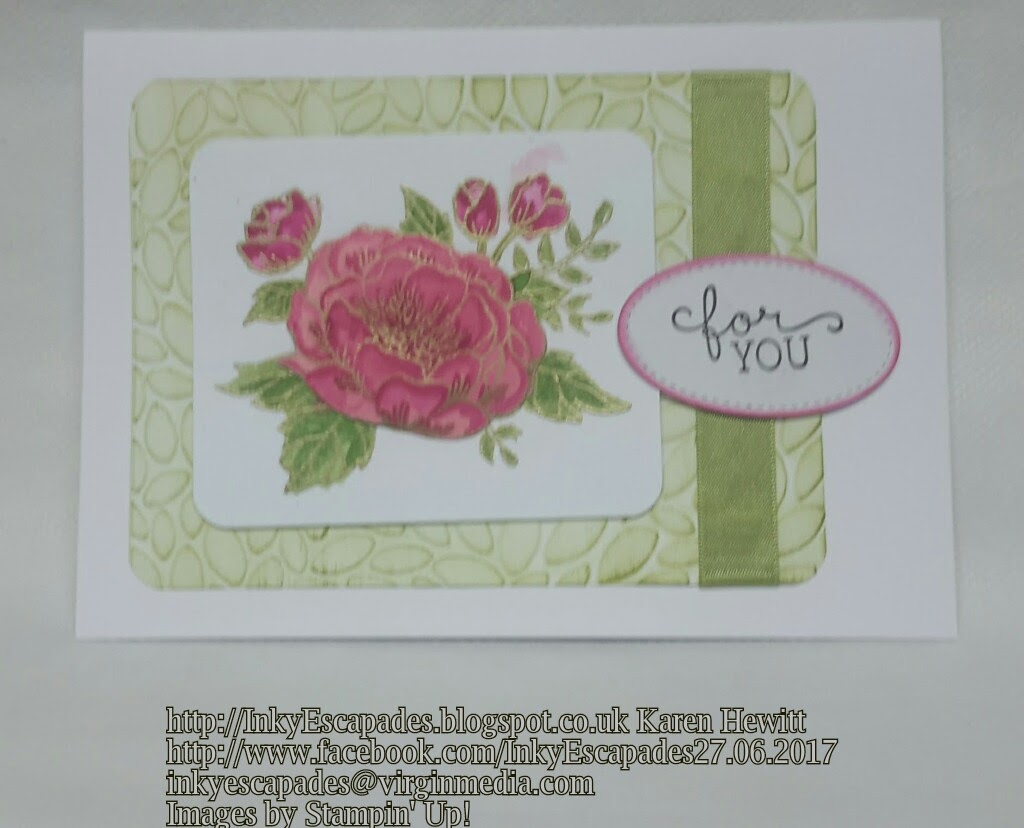
In the second card I have added more "Marbled" panels behind the main image and "kicked up" the design I love how you can keep things simple or go all out to create stunning cards

Sunday 9 July 2017

Watercolor Words

 I used stamps from Watercolor Words to create these two cards
The first was designed for a man, my uncle in fact and uses the star and two of the sentiments I used Island Indigo and Pool Party Inks which go together really well

The second card is much more feminine and uses two of the Flower stamps and the Happy Birthday Sentiment
I used Berry Burst and Powder Pink Inks which are two of the five new "In Colours" in the new catalogue

If you would like a copy of the new catalogue just drop me an email I would love to be able to include you in my Stampin'Up!  Family

Timeless Textures and Crafting Forever

So today I have mixed some old and new stamps to create this card for a crafty friend
I used a stamp from Timeless Textures to stamp around the outside in Crumb Cake then stamped the flowery one in Powder Pink and lastly the ink stain in Fresh Fig
I added the stitched shapes framelets with the scissors on one and the sentiment on the other
I also stamped one of the "stamp" designs to finish it off
I really like how it turned out

Swirly Bird, Swirly Scribbles & Layering Love

In honor of the sun I thought I would make a lovely bright card today
I have used Swirly Bird stamps and the co-ordinating dies Swirly Scribbles along with a sentiment from Layering Love
I have used Crushed Curry and Cajon Craze inks in the two step stamping
hope you like how bright it is now where's my shades!!

Tuesday 4 July 2017

Birthday Blooms & Petal Burst embossing folder


 I have three samples using the Birthday Blooms stampset and the Petal Burst embossing folder
I embossed a panel of card then inked it up using sponges and various ink colours
on a separate piece of card I stamped the main flower and embossed it with gold embossing powder then painted them with ink and an aqua painter
on the 1st card I added another image of the Flower on top with dimensionals but you can't really see it in the photos unfortunately


Monday 3 July 2017

Daisy Delight stamp's and Delightful Daisy DSP

 These two cards were made using some of the Delightful Daisy Designer series paper and the stamps from the Daisy Delight set for which there us a co-ordinating punch for the large daisy
The stampset has a lovely Thankyou sentiment both in font and size and we all need to send Thankyou cards don't we


Petal Burst embossing folder, Daisy Delight stamps & Punch


I made this card using the Petal Burst embossing folder which gives a lovely deep impression I inked up the card once embossed then added a strip of Delightful Daisy DSP
I then added a sentiment stamped with Label Me Pretty and punched it out with the
 co-ordinating punch

Lastly I stamped out two daisies from Daisy Delight and punched them out with the
 co-ordinating punch
I added a gem to the centre and popped it up onto the card using dimensionals

lift me Up stamp's and Up & Away thinlets

 Today I have four examples using the Lift Me Up stampset and the Up & Away thinlets with words from the Hostess set Dare to Dream

In each of the cards I have sponged the background to create the grass and sky then added stamped clouds and die cut clouds
I then stamped and die cut some hot air balloons including the filigree one which I think is stinning and added them to the scene
The smaller balloons I have lifted up with dimensionals

Lastly I added the sentiments from the "Hostess" stampset Dare to Dream I love the fonts and the sentiments in this set
I love how each card looks different just by switching the colours


Vintage Leaves

 I have used Vintage Leaves and the co-ordinating framelets along with the dynamic Hexagons embossing folder to create these two cards
in the first card I used the label punch with a sentiment from Number of Years
in the 2nd card I have used a framelets from Lots of Labels
in both cards I have inked up the embossed design and also inked the edges of the leaves

Wednesday 28 June 2017

Cool Treats, Frozen Treats Framelets and Lots of Labels framelets

 Today I have three cards using some yummy summery stamps
 I have created three cards using the Cool Treats stamps and the Frozen Treats framelets
If the stamps are small and  polymer I find it easier to cut out the framelets first then add the corresponding stamp I know you are supposed to do it the other way around but this works for me

I used the Lots of Labels framelets as my background and I have inked the edges on all the cards
The background papers on the first two cards is from some retired stuff no longer available
The last card I stamped the cool wording all over the back ground first before adding the labels and the ice cream and spoon